
Tuesday, July 26, 2011

Thursday, July 7, 2011
Congratulations Card

Thursday, May 26, 2011
Another Groovy Times Project - Gift Bags and Matching Cards

Creative Express Supply List:
Cricut: Expression, Design Studio
Cricut Cartridge: Groovy Times
Cricut Cardstock Packs: Greens and Black, Rainbow, Reds and Pinks
Doodlebug: Tangerine Jewels
Clearsnap Fluid Chalk Queues: Jelly Beans, Big Top
Other: Gift bags in bright colors, white gel pen, black fine-tip marker
Instructions:
1. Create the centers of your gift bags and cards using bright cardstock. Ink the edges of these pieces. draw stitches with a pen or marker along the edge of the inside piece. Layer these pieces together.
2. Each of the Cricut images used in both sets are from the Groovy Times cartridge. Each image contains several different layers. Each layer is a different color of cardstock.
3. Use the Cricut Design Studio or the Gypsy to design your layers. Open a page and arrange your layers so that you may preview how the pieces of your design fit together.
4. When you are ready to cut the pieces just open a new page for each color cardstock. Copy and paste pieces from the original page.
5. After each layer has been cut, ink the edges of each piece and start assembling the design.
6. Once the design has been attached to the cards and bags, add jewels to the center of the flowers and to the car for headlights.
7. Use either a white pen or black marker to draw stitches and highlights on the designs.

Last Assignments for CX - Groovy Times Composition Books
The CX design team is no more...I feel sort of lost....

Creative Express Supply List:
Cricut: Expression, Design Studio
Cricut Cartridge: Groovy Times
Cricut Cardstock Packs: Greens and Black, Rainbow
Basic Grey: Marjolaine Collection Pack
American Crafts: Adhesives Value Pack (includes foam tabs)
Clearsnap Fluid Chalk Queues: Primary Elements, Pumpkin Patch, Jelly Beans
Other: Ribbon, sandpaper, composition books
Instructions:
1. Cover the outside of the composition books with patterned paper. Sand the edges of the book so that the paper does not overlap the sides.
2. Use either the Gypsy or Design Studio to stretch these images into a size that will fit your composition book. (I have found that size of composition books tends to vary a little between brands).
3. Cut out Cricut images from the Groovy Times cartridge. Use patterned paper for the flowers and “Groovy” images. Use solid cardstock for the base and figure.
4. Ink the edges of the flowers, groovy, and base with fluid chalk.
5. Layer the images onto the composition book and add small flower and alphabet stickers from the Marjolaine collection.
6. Tie a bow in the ribbon and attach it to the cover of the large composition book.

Composition Books
Creative Express Supply List:
Cricut: Expression, Design Studio
Cricut Cartridge: Groovy Times
Cricut Cardstock Packs: Greens and Black, Rainbow
Basic Grey: Marjolaine Collection Pack
American Crafts: Adhesives Value Pack (includes foam tabs)
Clearsnap Fluid Chalk Queues: Primary Elements, Pumpkin Patch, Jelly Beans
Other: Ribbon, sandpaper, composition books
Instructions:
1. Cover the outside of the composition books with patterned paper. Sand the edges of the book so that the paper does not overlap the sides.
2. Use either the Gypsy or Design Studio to stretch these images into a size that will fit your composition book. (I have found that size of composition books tends to vary a little between brands).
3. Cut out Cricut images from the Groovy Times cartridge. Use patterned paper for the flowers and “Groovy” images. Use solid cardstock for the base and figure.
4. Ink the edges of the flowers, groovy, and base with fluid chalk.
5. Layer the images onto the composition book and add small flower and alphabet stickers from the Marjolaine collection.
6. Tie a bow in the ribbon and attach it to the cover of the large composition book.
Monday, May 9, 2011
Versatile Scrapper!
Janee just awarded me a Versatile Scrapper Award! Thank you!

Check out Janee's website: My Life as Janee
Something Fun! Cricut Summer in Paris – Address Book
This was the project of the month (February) on the Creative Xpress website. Thought I'd share it with you. I love the images on the Summer in Paris Cricut Cartridge.


Friday, March 25, 2011
Odds n Ends
The last of my last spring cleaning cards.


I don't know about you, but I am thrilled when I actually use up all of something. These are the last of some felt flower stickers that I'd been holding onto for years! About time I finally used them! LOL!

I found this already embossed left-over scrap at the bottom of that endless scrap drawer. the bird image was something that I had bought for a project that I never got around to. Feels good to use up these odds n ends finally.
Thursday, March 24, 2011
This and That
Just a couple more of my card creations that were inspired by the spring cleaning of my scrap drawer.
 I found some of my favorite pieces of patterned paper, a stamped image, and a chipboard key in the drawer. The key got sprayed with Glimmer mist and that little bit of left over ribbon tied around it seemed like a perfect way to spruce up these left-overs.


I found all kinds of goodies in that drawer. This card used a vintage image that I had experimented with on a transparency, several different stickers, an acrylic word, and a piece of my all time favorite patterned paper.
Wednesday, March 23, 2011
Keychain, Push Pins, Magnets

My tips and tricks for January and February at the CX store. I fell in love with the Groovy Times cartridge this month.
Push pins, magnets, and key chains are easy to create with the Cricut. Use the Cricut to cut the base for each item out of chipboard and layer other Cricut images on top.
To create the push pins, press a plain undecorated pin through the chipboard before decorating it.
Add an eyelet to the keychain after decorating is complete.
When finished decorating, cover the item with a clear acrylic glaze and let it dry.
For best drying results for the push pins press them onto a piece of cardboard before applying the glaze.
Drying will take several hours…be patient.
Sunday, March 20, 2011
Bits and Pieces
I decided to do a little early spring cleaning a couple of weeks ago and my scrap paper drawer was one of my targets. Once I started rummaging through the drawer I became so inspired by some of the things in it that I got on a card making roll!


I made this card from a die-cut, paint chip, and patterned paper that I found in the drawer and the stem was left over from a recent project I had been working on. I found so many goodies in that scrap drawer.
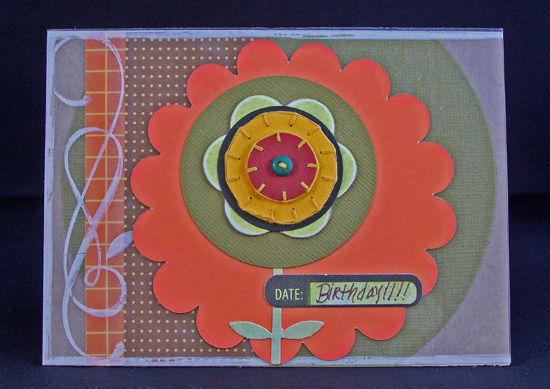
This card was inspired by a transparent photo frame I saw in the drawer, left-over shapes and some older stickers.
Thursday, December 9, 2010
Tips and Tricks for Making Embellishments “Pop”
Another tip that I created for the CX blog.

I love to make my embellishments “pop” off my pages and cards. It so easy to give more dimension to your embellishments by simply using foam tabs. These tabs will add a little bit of extra visual interest to any project and will certainly make an eye-catching statement. Pick one vital element on your creation and add foam tabs or tape on the back before you place it on your page or card.


I love to make my embellishments “pop” off my pages and cards. It so easy to give more dimension to your embellishments by simply using foam tabs. These tabs will add a little bit of extra visual interest to any project and will certainly make an eye-catching statement. Pick one vital element on your creation and add foam tabs or tape on the back before you place it on your page or card.

Thursday, September 23, 2010
Tips and Tricks (Finding Vintage Images)
For the last year, I've been creating blog entries for Creative Xpress about different tips and tricks that I use. I thought that I'd start sharing them here too.


One of the easiest ways to obtain these images is to do an online search. There are many sites that have images available to download or copy for free. Type the words vintage postcards, vintage images, or vintage photos into your browser search. It is very important to include the word free in the search. Many images are copyrighted and require a fee to use them. Once you have found an image you like and are sure that you won’t be violating any copyrights, either download it or copy and paste it into your picture library.


Country Life Cricut Cards


I got to play with the new Country Life cartridge this month for Creative Xpress. I love the images on this cartridge. They are different from any other cartridges that I own. I also played with new paper packages from American Crafts: I Do and Adobe. Love these new papers.
Sunday, September 12, 2010
Halloween Outdoor Decor


My assignment for last month at CX was to create some outdoor decorations for Halloween using the new Cricut Cartridge October 31st. There are some really great images on this cartridge. Instructions for creating these projects will be published on the Creative Xpress blog in the future.
Tuesday, August 3, 2010
Latest card for ATC swap

The theme for this swap was "time." Had fun creating this card used a page from an old book and cut my image from the Forever Young Cricut cartridge and then colored it with pens.
Saturday, July 10, 2010
Friday, July 9, 2010

Thursday, June 17, 2010
Cutting Fabric with Cricut


I was terrified to try cutting fabric with my Expression. After I messed around for a while, I got more comfortable with the idea and it became fun. I created this T-Shirt using the Indy Art Cricut Cartridge, a $5 shirt from Kohl's (love that store lately), and Ranger's Smooch Accent Inks.
Friday, May 14, 2010
Graduation Center Piece
 This is a set that I created using one of the new Cricut Solutions cartridges. I was asked to create something for a new infomercial. Hopefully you will see it soon.
Major Computer issues!
Grrr....my old computer bit the dust last week. My hard-drive just up and died! I cannot remind you of the importance of saving your files somewhere else besides on your hard-drive. I lost over a year of photos, music uploads, and documents. Makes me sick that I was just too darn cheap to buy more on-line storage. I will admit that Norton was excellent about helping me restore the files that I did have saved on their site. Thank you Norton for all those hours of working with me and then just finally taking over my computer and doing the job yourself! :)
Subscribe to:
Posts (Atom)